
Everything You Should Know About Sourdough Bread
If you’ve ever torn into a loaf of sourdough bread and wondered what makes it taste so different from the sliced white on the supermarket shelf, you’re in good company. From Cape Town coffee shops to kitchen counters across the country, sourdough has become the bread people reach for when they want something real. This guide covers everything: what sourdough actually is, why it takes so long, why it costs more, how to bake it yourself, and how we approach it at Cakella.
Quick Answer: What Makes Sourdough Bread Different?
Sourdough bread is not just another loaf with a fancy name. It is a traditional artisan bread made through a slow fermentation process that sets it apart from virtually every other bread on the shelf. Here is what you need to know at a glance.
Sourdough is naturally leavened. Instead of adding commercial yeast from a packet, bakers use an active sourdough starter-a living culture of wild yeast and lactic acid bacteria that has been nurtured over days or weeks. Sourdough fermentation involves wild yeast and bacteria working together to raise and flavour the dough, producing results that instant yeast simply cannot replicate.
The wild yeast in the starter generates carbon dioxide, which makes the bread rise. Meanwhile, the lactic acid bacteria produce organic acids-lactic and acetic-that create the signature tang, improve texture, and help preserve the loaf naturally. This combination of organisms is what turns a simple dough mix of flour and water into something far more complex.
Sourdough requires a long fermentation process, often taking 24 hours or longer from the first starter feed to the moment you pull a finished loaf from the oven. There are no shortcuts that deliver the same depth.
Why go through all that effort? Because the results speak for themselves:
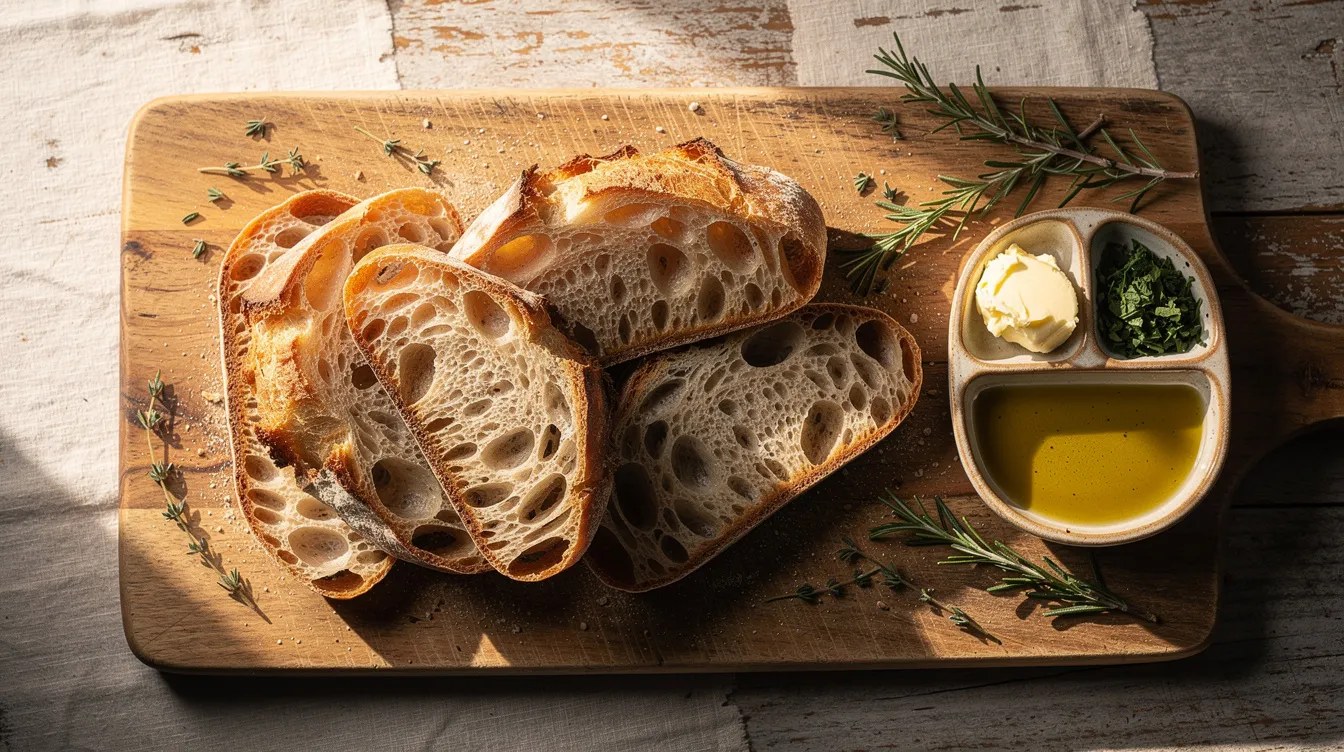
- Sourdough has an open crumb with large holes compared to regular bread’s uniform texture, giving each slice a distinctive chewy character.
- The slow fermentation process develops layers of flavour-sweet, tangy, sometimes fruity-that you simply cannot get from a fast-rise dough.
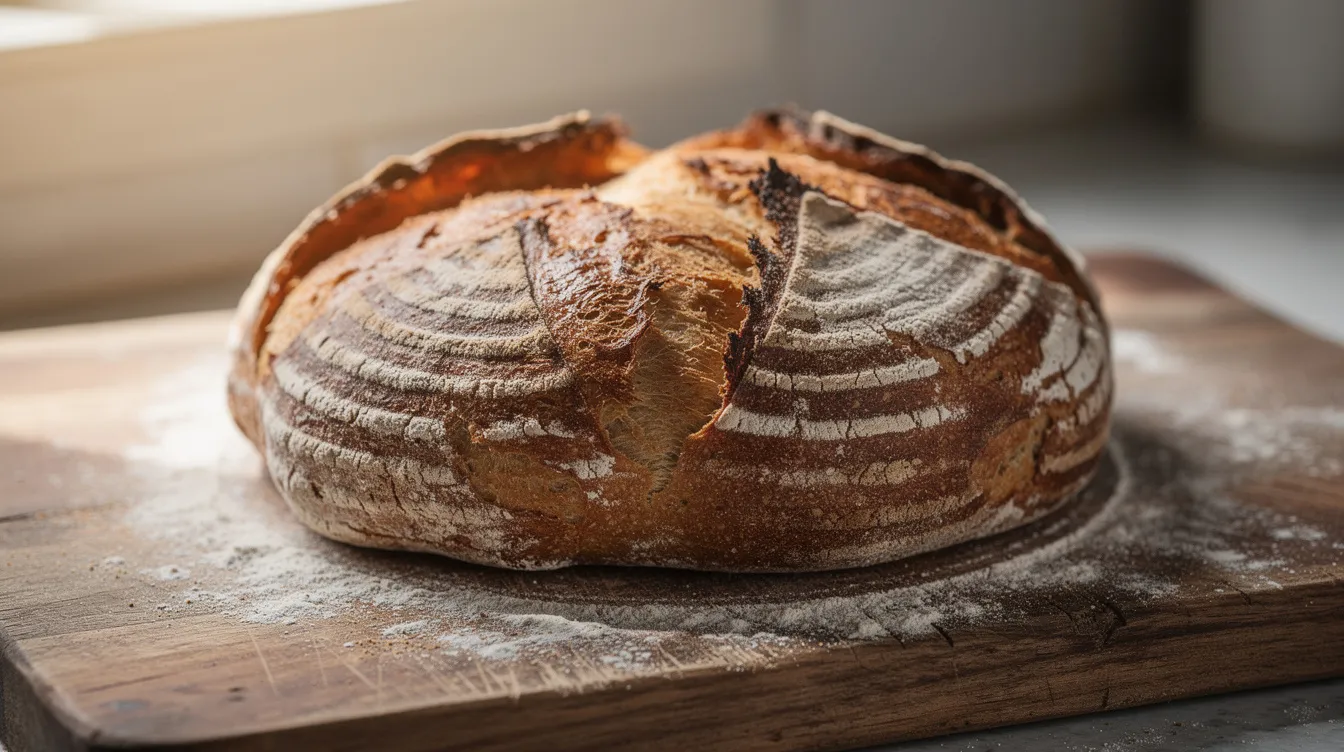
- A properly baked sourdough loaf develops a crisp, caramelised crust that crackles when you press it.
- Sourdough is easier to digest than regular bread because of its long fermentation process, and the natural acidity helps extend shelf life without preservatives.
At Cakella, every loaf is handcrafted using long bulk fermentation, and we bake in a blazing-hot baking pot or dutch oven to trap steam and deliver that signature crackling crust our customers keep coming back for.
What Is Sourdough Bread, Really?
Sourdough is one of the oldest forms of bread baking known to humanity. Long before anyone had heard of instant yeast, ancient Egyptians were mixing flour and water, letting ambient microbes do the work, and baking flatbreads and loaves over open heat. That same principle carried through European village bakeries for centuries. Today, modern artisan bakers in cities like Cape Town have revived these methods, producing flavorful bread that connects us to thousands of years of tradition.
At its simplest, sourdough bread is flour, water, salt, and a sourdough starter. No more, no less. The starter is a living ecosystem: wild yeast species produce carbon dioxide and small amounts of alcohol to leaven the dough, while lactic acid bacteria transform sugars into organic acids. Fermentation produces lactic and acetic acids in sourdough, and these acids are responsible for the gentle tang, the improved keeping quality, and the resistance to mould that set sourdough apart from ordinary bread.
The acids also lower the pH of the dough, activating enzymes in the flour that break down compounds like phytic acid. This is one reason sourdough stands out nutritionally, but more on that shortly.
It is worth understanding the difference between authentic sourdough bread and the “sourdough-flavoured” loaves that fill many supermarket shelves. Those commercial products typically use commercial yeast for a fast rise, then add vinegar or powdered acids to mimic tang. Some include a tiny percentage of “mother dough” as a marketing ingredient but rely on industrial yeast for the actual leavening. The result looks similar but delivers less flavour, less depth, and fewer of the benefits that come from genuine fermentation.
At Cakella, we only bake naturally fermented sourdough. Whether it is a simple white boule or a hearty country-style brown loaf, every product in our range is true sourdough: wild yeast, slow fermentation, and hands on every loaf. No commercial yeast is added to speed up the process.
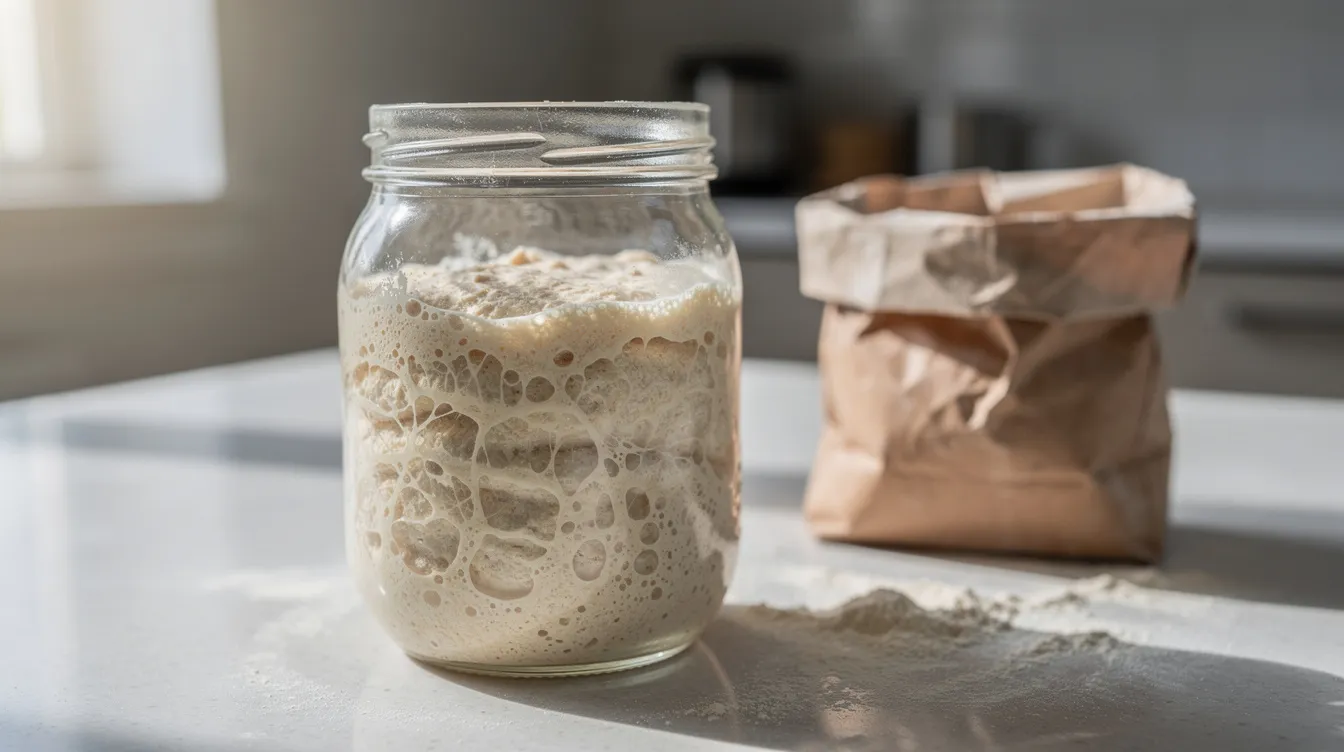
Inside the Sourdough Starter: The Living Heart of the Loaf
A sourdough starter is a mix of flour and water that, over time, becomes colonised by wild yeast and beneficial bacteria from the flour itself and the surrounding environment. Think of it as a miniature ecosystem living in a jar on your kitchen counter. Creating a sourdough starter takes 7 to 14 days of daily feeding before the culture stabilises into something reliable enough to leaven bread.
The microbial roles are straightforward. Wild yeast-species such as Saccharomyces cerevisiae and Kazachstania varieties-consume sugars in the flour and release carbon dioxide, which is what makes the bread rise. Lactic acid bacteria, including well-studied species like Lactobacillus sanfranciscensis, produce the acids that define sourdough’s tang and contribute to its naturally longer shelf life. Sourdough contains beneficial bacteria like lactobacillus and acetobacillus, and research shows that these microbial communities stabilise over repeated feedings as less competitive organisms are outcompeted by the acid-tolerant strains.
How do you know your starter is healthy? A fed starter is ready when it doubles in size within 4 to 8 hours. It should show plenty of bubbles throughout, smell pleasantly tangy or yoghurty (never sharp or nail-polish-like), and hold a light, foamy structure. At around 22 to 25°C, a well-maintained starter hits these marks reliably.
Maintaining a starter at home is simpler than most people expect:
- Feed your sourdough starter every 1 to 2 weeks if refrigerated, using unbleached white flour or a blend with whole wheat flour or whole grain rye flour for added microbial diversity.
- Before baking, revive the starter with at least two room temperature feeds to bring activity back to full strength.
- Discard a portion before each feed to keep acidity balanced and prevent the culture from becoming sluggish.
- Store in a clean glass jar with a loose lid, allowing gases to escape.
At Cakella, we maintain mother starters year-round in our Kuilsriver kitchen, carefully controlling temperature and feeding schedules so that the flavour profile stays consistent from one batch to the next-whether it is a scorching February afternoon or a cool, rainy morning in June.
Is Sourdough Bread Healthier? What the Fermentation Really Does
Sourdough is still bread. It contains carbohydrates, it comes from grain, and it is not a health food in isolation. But the long fermentation process changes what happens inside the dough before it reaches your plate, and those changes are meaningful.
The fermentation process of sourdough breaks down phytic acid, improving nutrient absorption. Phytic acid is a compound naturally present in grains that binds to minerals and makes them harder for the body to absorb. Research has shown that whole wheat sourdough fermentation can reduce phytic acid by approximately 62 percent, compared to only about 38 percent with standard baker’s yeast. The result is that sourdough bread has increased bioavailability of minerals and nutrients-including iron, zinc, and magnesium-making the minerals in your bread more accessible to your body.
Sourdough generally has a lower glycemic index than regular bread. The extended fermentation pre-digests some starches and proteins, and studies have found that sourdough breads produce significantly lower post-prandial glycemic responses than equivalent breads made with commercial yeast. For people watching blood sugar levels, this is a practical distinction.
Sourdough fermentation helps break down gluten for easier digestion. This does not mean sourdough made from wheat flour or rye flour is gluten free-it is not, and anyone with coeliac disease should avoid it unless it is made with certified gluten-free flours. However, many people with non-coeliac sensitivities report that long-fermented sourdough sits better with their digestion than factory-produced bread. The partial protein breakdown during fermentation is likely a factor.
Natural fermentation improves the keeping quality of sourdough bread as well. The organic acids produced by lactic acid bacteria lower the pH, which slows mould growth and staling. This means your loaf stays fresh longer without any preservatives or additives.
At Cakella, we lean into this: slow fermentation-often 24 to 36 hours per loaf-with a simple ingredient list of flour, water, salt, and starter. Time does the work that additives do elsewhere.
The Sourdough Process Step by Step (From Starter to Baked Loaf)
This section is a clear roadmap you can follow to make sourdough bread at home. The process mirrors the methods artisan bakers use, but written in everyday language so you can work through it confidently on your first attempt.
The timeline spans one to two days and moves through six key phases: activating the starter, mixing and autolyse, stretch and fold, bulk fermentation, shaping and cold proofing, and finally baking sourdough bread in a hot dutch oven or baking pot. The quantities given below are example numbers-enough to form the backbone of an easy sourdough bread recipe that you can refine over time.
Cakella follows a similar structure but adjusts hydration, fermentation time, and shaping techniques for different loaves like The Daily Loaf and Bushveld Sourdough.
1. Feed and Activate the Sourdough Starter
The evening before you plan to mix the dough, pull your starter from the refrigerator. Discard down to about 20 to 30 grams, then feed with roughly 60 grams of bread flour (or a blend of white flour and dark rye flour) and 60 grams of water. This gives you a 1:3:3 ratio of starter to flour to water, which produces a strong, vigorous rise.
At 20 to 22°C, the starter typically doubles in 6 to 10 hours. At warmer temperatures of 24 to 26°C, it may be ready in 4 to 6 hours. You want to use it at or just past its peak.
How do you know it is ready? Look for these cues:
- The starter has visibly doubled or tripled in volume.
- The surface is domed and covered in bubbles.
- Perform a float test to check if the starter is ready: drop a small spoonful into a glass of room temperature water. If it floats, fermentation has produced enough gas and the culture is active.
If your starter is sluggish after being refrigerated for a while, feed it twice a day at room temperature for two to three days before your bake. Using whole grain rye flour or whole wheat flour in the feed gives the microbes more nutrients to work with. Keep it warm-but below 30°C, as excessive heat can stress the organisms. How much sourdough starter you ultimately need depends on your recipe, but 100 grams is a common amount for a single sourdough loaf.
2. Mix the Dough and Autolyse
Here is an example formula for a straightforward loaf:
| Ingredient | Amount |
|---|---|
| Bread flour (such as king arthur bread flour or similar unbleached) | 500 g |
| Water | 350 g |
| Active sourdough starter | 100 g |
| Fine sea salt | 10–11 g |
You can substitute 10 to 20 percent of the bread flour with whole wheat flour for a more complex flavour and darker crumb.
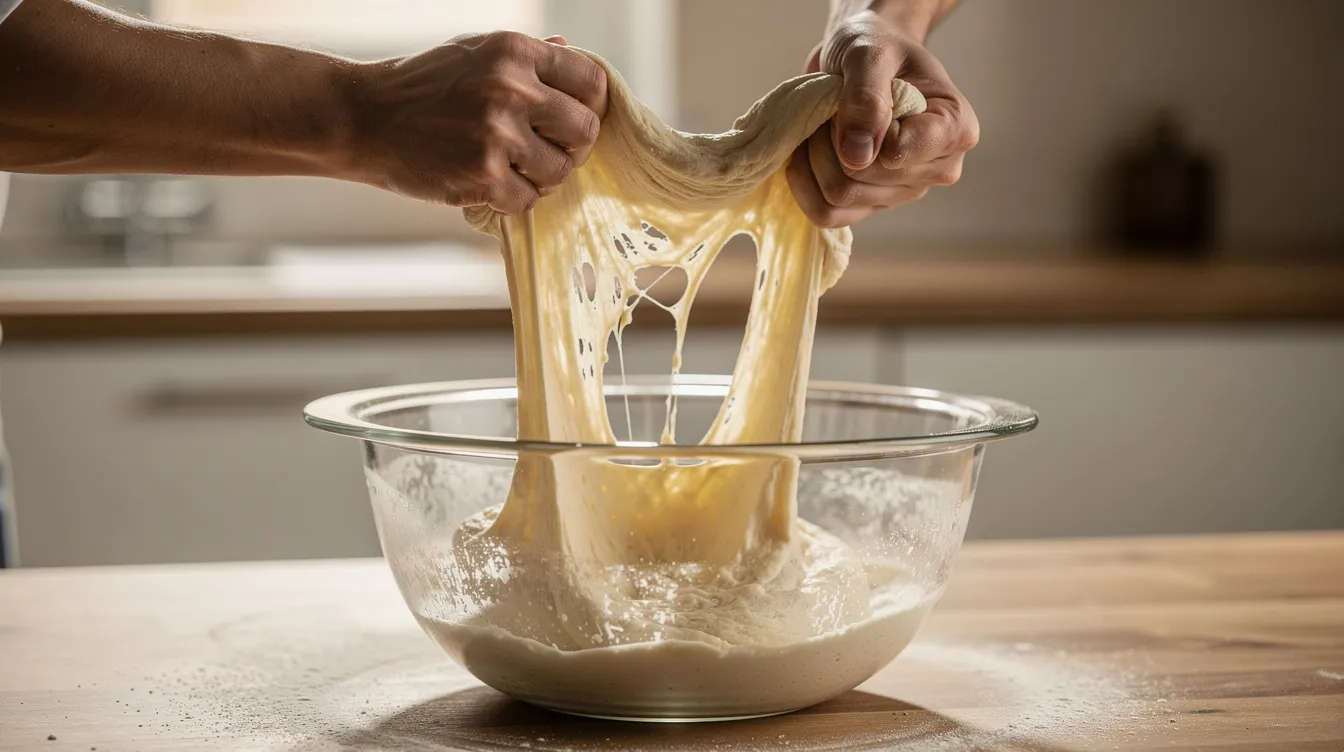
Mix 500 grams of bread flour with 350 grams of water in a large mixing bowl (or any large bowl that gives you room to work). Stir until you have a shaggy mass with no dry patches. Some bakers prefer to let the dough rest for 1 hour during the autolyse phase before adding the starter and salt. During this rest, enzymes in the flour begin breaking down starches and proteins, improving extensibility and flavour in the finished bread.
After autolyse, add the active starter and salt. Mix the dough by hand, squeezing and folding until everything is incorporated. The sourdough bread dough should look rough and slightly sticky but hold together as a cohesive mass. If you prefer simplicity, you can skip autolyse and combine all ingredients at once-many home bakers do this for their first few loaves with excellent results.
Use a kitchen scale for accurate ingredient measurements. Volume cups are unreliable for flour, and even small variations can dramatically change hydration and crumb structure. A scale is the single most important tool for reproducible results.
After mixing flour and all other ingredients, cover the bowl with a damp towel or plastic wrap and let the dough sit at room temperature while you prepare for the next step.
3. Strengthen the Dough: Stretch and Fold
Instead of intensive kneading, modern sourdough methods rely on a technique called stretch and fold to develop gluten structure gently during the first stage of bulk fermentation. This preserves the gas bubbles that give sourdough its characteristic open crumb.
Here is how one set works:
- Lightly wet your hand to prevent sticking.
- Grab one edge of the dough gently, stretch it upward as far as it will go without tearing, and fold it over the centre.
- Rotate the bowl a quarter turn and repeat.
- Complete 4 to 6 folds to finish one set.
Perform stretch and folds every 30 minutes for 2 hours during bulk fermentation-that gives you roughly 3 to 4 sets total. After each set, you should notice the dough becoming smoother, more elastic, and increasingly able to hold its shape. By the final set, the dough should feel noticeably different from the shaggy mass you started with.
Cover the bowl between sets to prevent the surface from drying out and to maintain a stable dough temperature. After the last set of folds, let the dough rest undisturbed for the remainder of bulk fermentation. Handle the fermenting dough gently throughout-rough handling pops the bubbles you have been carefully building.
4. Bulk Fermentation (First Rise)
Bulk fermentation is the main rise after mixing, and it is where much of the magic happens. This is when the wild yeast and bacteria in your starter transform the bread dough into something alive and complex. Sourdough fermentation enhances bread’s flavor and texture during this critical window.
Bulk fermentation typically lasts 3 to 12 hours depending on conditions. Dough temperature affects fermentation speed and flavor development more than almost any other variable. Here are general guidelines:
| Kitchen Temperature | Approximate Bulk Time |
|---|---|
| 24–26°C (warm summer kitchen) | 4–6 hours |
| 20–22°C (mild conditions) | 5–7 hours |
| 18–20°C (cool winter kitchen) | 7–10 hours |
Bulk fermentation can take 7 to 10 hours at room temperature in cooler conditions, which is perfectly normal. Whole grain flours tend to accelerate fermentation, while pure white flour runs slightly slower.
Dough should rise 50 to 75 percent during bulk fermentation-not a full double. Look for these signs that bulk is complete:
- The dough has increased noticeably in volume (use a straight-sided, clear container to judge this more easily).
- The surface appears smoother and slightly domed.
- Visible bubbles dot the sides and top.
- When you gently shake the container, the dough jiggles like a soft pillow.
If your schedule does not allow you to watch the dough for hours on end, you can use the refrigerator to pause bulk fermentation partway through. Chill the dough, then bring it back to room temperature later to continue. Long, cool bulk fermentation encourages deeper flavour and more acid development, while warmer conditions produce a milder, less tangy result.
At Cakella, bulk fermentation times are adjusted seasonally to keep dough between roughly 23 and 26°C, balancing flavour depth and structural integrity regardless of what Cape Town’s weather is doing.
5. Shape, Cold-Proof, and Prepare to Bake
Once bulk fermentation is complete, it is time to shape the dough. Scrape dough gently out of the bowl onto a lightly floured surface. Use a dough scraper to help-the dough will be soft and slightly sticky.
Pre-shape into a loose round by folding the edges toward the centre and flipping seam-side down. Let the dough rest for 15 to 20 minutes. This rest allows the gluten to relax, making final shaping easier and more precise.
Now perform the final shape. Shaping bread dough for a boule means tucking edges under to create surface tension on the outside, which helps the loaf hold its form in the oven. Shape the dough firmly but without crushing all the internal air pockets-those bubbles are what give you the open crumb later. Over-proofed dough can become sticky and hard to shape, so if your dough feels slack and won’t hold tension, it may have fermented too long.
Place the shaped dough seam-side up in a proofing bowl or banneton that has been dusted generously with rice flour (rice flour is ideal because it resists absorbing into the dough and prevents sticking far better than wheat flour). If you do not have a banneton, any deep bowl lined with a well-floured cotton towel works as a practical alternative.
For the final proof, cold proofing in the refrigerator for 12 to 24 hours is the approach most artisan bakers prefer. The cold slows yeast activity but allows lactic acid bacteria to continue working, deepening flavour complexity. Cold dough is also much easier to score neatly before baking. Cover the proofing bowl with plastic wrap or a shower cap and slide it into the fridge.
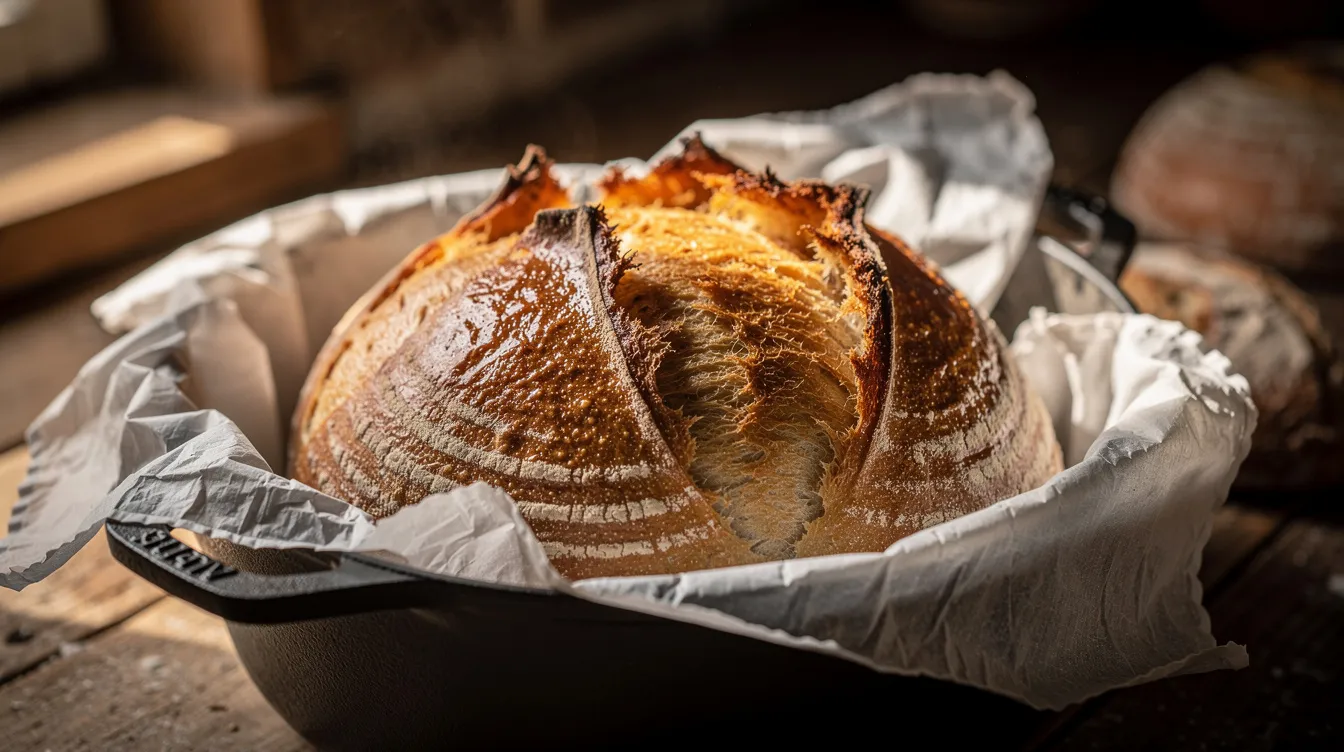
6. Bake Sourdough Bread in a Dutch Oven or Baking Pot
This is where patience pays off. A Dutch oven traps steam for better sourdough crust-the moisture released from the dough stays sealed inside the pot, delaying crust formation and allowing maximum oven spring. Oven spring is the dramatic burst of rise that happens in the first minutes of baking, and it is what gives artisan loaves their height and ear.
Preheat the oven to 450°F (232°C)-or 230 to 250°C if your oven reads in Celsius-with the empty dutch oven inside for at least 30 minutes. A 5-quart Dutch oven is ideal for baking sourdough bread, providing enough room for the loaf to expand without touching the sides. Any oven safe pot with a heavy lid that tolerates these temperatures will work.
While the oven preheats, remove your cold dough from the refrigerator. Invert it onto a piece of parchment paper. Using a bread lame (a razor-sharp scoring tool) or a sharp knife, score the top of the loaf with a decisive slash about 6 to 8 millimetres deep. Dough should be scored before baking to allow expansion-without a score, the loaf can burst unpredictably.
Carefully open the oven door, pull out the rack, and lift the lid of the hot dutch oven. Using the parchment paper as a sling, lower the dough into the preheated dutch oven. Replace the lid and slide the oven rack back in.
Bake the bread at 232°C for 20 minutes covered, then 25 to 30 minutes uncovered. When you remove the lid, the loaf should have sprung up noticeably and begun to colour. The remaining uncovered baking time is what develops the deep golden brown to chestnut crust. Internal temperature should reach 96 to 98°C (205 to 210°F) when measured with a probe thermometer.
If you do not have a dutch oven, a preheated baking stone or steel combined with a metal bread pan filled with boiling water placed on the oven rack below can generate steam-though the results may differ slightly from the sealed-pot method. A loaf pan can also work for a different shape, though you will sacrifice some crust development.
Once baked bread comes out of the oven, resist the urge to slice immediately. Bread should cool for 1 to 2 hours to avoid gumminess. The crumb is still setting as it cools-cutting too early releases steam and leaves you with a doughy interior. Let the bread cool on a wire rack where air can circulate underneath.
Timing and Schedules: Fitting Homemade Sourdough Bread Into Real Life
Here is the good news: you do not need to hover over your dough for two straight days. The beauty of time making sourdough bread is that the refrigerator becomes your pause button. Cold proofing, overnight fermentation, and refrigerated starters let you fit sourdough baking around a normal working week.
Sample Weekday Schedule:
| Step | When | What Happens |
|---|---|---|
| Feed starter | Thursday, 8:00 p.m. | Discard and refresh; leave at room temperature overnight |
| Mix and autolyse | Friday, 8:00 a.m. | Combine ingredients; begin bulk fermentation |
| Stretch and fold | Friday, 8:30 a.m.–10:00 a.m. | 3–4 sets, 30 minutes apart |
| End bulk fermentation | Friday, 2:00–4:00 p.m. | Dough has risen 50–75% |
| Pre-shape and final shape | Friday, 4:00 p.m. | Shape, place in banneton |
| Cold proof | Friday evening–Saturday morning | Refrigerate 12–18 hours |
| Bake | Saturday, 7:00–8:00 a.m. | Preheat, score, bake |
| Cool and slice | Saturday, 9:30 a.m. | Fresh loaf ready for breakfast |
In Cape Town, summer kitchens run warmer, which means bulk fermentation will finish faster-you may need to shape earlier in the afternoon or use cooler water. Winter kitchens slow everything down, so let the dough take its time or find a warmer spot near your oven.
The most important principle: watch the dough, not the clock. Volume increase, feel, and aroma should always overrule strict timing when baking sourdough bread. Dough that looks and feels ready at hour five is ready at hour five, even if a sourdough recipe says six.
At Cakella, we run multi-day schedules to coordinate multiple doughs and flavours in small batches-starting different loaves on different timelines so that fresh sourdough bread is available for every order without compromising fermentation quality.
Equipment You Really Need (and What’s Just Nice to Have)
You can make sourdough bread with remarkably basic equipment. A few targeted purchases make the process smoother, but you do not need to outfit a professional bakery.
Core Essentials:
- A large mixing bowl (or large bowl) for mixing and bulk fermentation
- A digital kitchen scale accurate to the gram
- A dough scraper for handling sticky dough
- A bread lame is used for scoring dough before baking; a sharp knife or razor blade works in a pinch
- An oven safe pot or dutch oven with a lid-heavy, thick-walled, able to handle 250°C
- Clean kitchen towels for covering dough
- Parchment paper for transferring dough into the hot pot
Helpful Upgrades:
- Banneton baskets in round or oval shapes for proofing
- An instant-read thermometer for checking internal loaf temperature and dough temperature
- A straight-sided clear container for judging the dough rise during bulk fermentation
- A proofing box or consistently warm spot (around 24 to 26°C)
- A wire rack for cooling baked bread properly
- Rice flour for dusting bannetons (prevents sticking better than regular flour)
Note that you will not need baking soda for sourdough-that is a different leavening system entirely. Sourdough relies exclusively on natural fermentation for its rise.
Any heavy, lidded pot that tolerates 230 to 250°C can stand in for a dutch oven inside the oven. Cast iron, enamelled cast iron, and heavy ceramic bakers all work well.
At Cakella, we use commercial deck ovens and professional proofing cabinets for precise heat and humidity control, but the underlying principles are identical to what you do at home with a baking pot and a kitchen thermometer.
Why Artisan Sourdough Bread Costs More (and Why It’s Worth Every Slice)
When you see the price tag on a loaf of sourdough bread from an artisan bakery, the natural question is: why does this cost more than the bag of sliced bread at the supermarket? The answer is not a secret ingredient-it is time, skill, and the refusal to take shortcuts.
Consider the labour involved. Every sourdough loaf requires:
- Daily feeding and monitoring of the starter
- Mixing by hand or in small batches
- Multiple stretch and fold sessions spaced across hours
- Hours of bulk fermentation that must be watched and assessed
- Individual shaping bread dough by hand, creating tension without crushing the crumb
- Cold proofing overnight in limited refrigerator space
- Scoring each loaf individually before baking
- Baking in small batches at high temperatures
A single Cakella loaf can easily take 24 to 48 hours from first starter feed to cooled, sliced bread. A factory loaf can be produced in three to five hours using industrial yeast, mechanical kneading, and dough conditioners.
Ingredient costs for a single loaf are modest-often only a few dollars worth of flour, water, and salt. But retail pricing for artisan sourdough reflects the dominance of labour and time in the cost structure. Skilled bakers experiment, adjust proof times for temperature changes, and shape every loaf by hand. In Cape Town, a hot February day demands different timing than a cool, wet morning in June-and someone has to make those calls.
Quality ingredients matter too. At Cakella, we use unbleached flours, carefully measured salt, and no improvers, enzymes, or preservatives. The ingredient list is short because the fermentation process does what additives do in factory bread.
What customers get in return: real flavour complexity, satisfying texture, better digestibility, and the experience of a crust that crackles and a crumb that pulls apart in soft, irregular strands. You are not just buying bread-you are investing in traditional bread baking craft.
The Science Behind the Tang: Lactic Acid, Wild Yeast, and Fermentation
If you have ever wondered why one sourdough loaf tastes mildly tangy while another bites with a sharper vinegar-like edge, the answer lives in the microbiology of the dough.
A sourdough starter is a stable culture of lactic acid bacteria-mainly Lactobacillus and related species-and wild yeasts, all living on flour and in the bakery environment. These two groups of organisms cooperate and compete in ways that researchers continue to study, but the broad outlines are well understood.
Wild yeasts ferment sugars in the flour into carbon dioxide and small amounts of alcohol. The carbon dioxide inflates the gluten network that stretch and fold sessions have built, causing the dough to rise and creating those irregular holes that define a good sourdough loaf. The alcohol evaporates during baking, contributing subtle aroma compounds along the way.
Lactic acid bacteria transform carbohydrates into two main acids. Lactic acid delivers a softer, creamier sourness-think yoghurt or buttermilk. Acetic acid provides sharper, more vinegar-like notes. The ratio between these two acids defines the character of the finished loaf. Acidification also activates natural cereal enzymes in the flour, particularly phytase, which helps break down phytates and alters the dough’s texture and nutritional profile.
Bakers can tune the sourness of their bread by adjusting a few variables:
- Temperature: Warmer doughs and warmer bulk fermentation favour lactic acid production, yielding a milder, more rounded tang.
- Hydration: Wetter doughs tend to ferment faster and produce more lactic acid; stiffer, drier starters favour acetic acid and sharper flavour.
- Cold proofing duration: Longer cold retards shift the balance toward acetic acid, producing a more complex and assertive sour bite.
Understanding these levers is what separates a simple sourdough bread from an easy sourdough bread that tastes exactly the way you want it to. It is also what allows Cakella to maintain a consistent flavour profile across seasons, adjusting fermentation conditions rather than changing ingredients.
From Our Oven: Cakella’s Signature Sourdough Breads
At Cakella, all sourdough is long-fermented, naturally leavened, and baked fresh to order from our kitchen in Kuils River, Cape Town. Every fresh loaf starts with our mother starter and receives the full attention of hand-mixing, slow bulk fermentation, individual shaping, and high-heat baking with steam.
The Daily Loaf Sourdough Range
Our signature sourdough bread good for every occasion. Available in:
- Traditional White – Soft, open crumb with a mild tang. Ideal for toast, sandwiches, soups, and breakfast.
- Traditional Brown – Includes whole grain components for a richer, earthier flavour and darker crumb. Perfect for hearty sandwiches and rustic meals.
Experience the rich, Mediterranean-inspired flavours of handcrafted sourdough bread made with premium Kalamata olives and fragrant oregano.
For something uniquely South African, our Bushveld Sourdough combines naturally fermented dough with premium biltong and cracked black pepper. The result is a bold, savoury loaf with a crisp crust, soft aromatic crumb, and a flavour profile that belongs on every braai table and cheese board.
Experience the rich, comforting flavours of slow-caramelised onion and roasted garlic, baked into every handcrafted loaf.
Filled with mature cheddar cheese and fragrant rosemary, every slice offers a delicious balance of rich, savoury cheese and aromatic herbs.
How to Enjoy, Store, and Reheat Sourdough Bread
A good sourdough loaf is versatile enough to carry every meal of the day.
Serving ideas:
- Warm slices with good butter-nothing else needed
- Toasted with eggs, avocado, or your favourite breakfast spread
- Grilled cheese sandwiches where the tang of the bread plays off melted cheese
- Bruschetta topped with tomatoes, garlic, and olive oil
- Alongside stews, curries, or soups for dipping
- As part of a cheese and charcuterie board
- Dipped in olive oil and balsamic vinegar
- As the ideal companion to your next braai
Storage:
Keep your fresh sourdough bread at room temperature in a paper bag, bread box, or wrapped in a clean cloth for two to three days. Avoid sealing in plastic wrap unless your climate is extremely dry-trapped moisture softens the crust and can encourage mould.
Freezing:
Sourdough freezes well. Slice or keep whole, wrap tightly in freezer film or plastic wrap, place in a freezer bag, label with the date, and store for up to about three months. Thaw at room temperature or toast slices directly from frozen.
Reheating:
To revive a whole loaf, preheat oven to about 180°C (350°F) and bake for 10 to 15 minutes until the crust re-crisps. Slices go straight from frozen into a toaster or onto the oven rack. Avoid microwaving-it makes the crumb tough and rubbery while turning the crust leathery.
When to slice: Let the bread cool completely-at least 1 to 2 hours after baking-before cutting. The crumb is still setting as steam escapes. Slicing too early yields a gummy, doughy texture no matter how well you baked the loaf.
Getting Started With Your Own Homemade Sourdough Bread
If you have read this far, you are ready. Your first few loaves of homemade sourdough bread will not be perfect, and that is exactly the point. Each bake teaches you something about fermentation cues, dough feel, timing, and what your specific kitchen and flour do to a simple sourdough bread recipe.
Start with a single easy sourdough bread loaf baked in a dutch oven. Use moderate hydration-around 70 to 72 percent-mostly white flour, and follow the straightforward timeline outlined above. Do not lightly flour every surface; learn to use a dough scraper and wet hands instead. Aim for a sourdough recipe that you can repeat, adjust, and gradually make your own.
Keep a basic baking journal. Record the flour brand and type, room and dough temperature, how much sourdough starter you used, bulk fermentation length, proofing time, and what the baked bread looked like and tasted like. Patterns will emerge quickly.
Focus on three fundamentals before experimenting with fancy additions or high hydration:
- Maintaining an active sourdough starter that doubles reliably after feeding
- Reading bulk fermentation cues-volume, bubbles, dough feel-rather than watching the clock
- Baking with enough heat and steam to get proper oven spring and crust
For readers in Cape Town, tasting artisan sourdough in person helps calibrate your expectations. Cakella’s loaves are available for collection in Kuilsriver or delivery in selected Cape Town areas. Taste the difference that time, patience, and traditional baking make-then take what you learn back to your own kitchen.
Freshly baked. Made to order. Crafted for meaningful moments.
Frequently Asked Questions
-
Is sourdough bread healthy?
Yes. Sourdough bread is naturally fermented using wild yeast, which may make it easier to digest than many commercially produced breads. It also contains no commercial yeast and is made using traditional baking methods.
-
How do you bake sourdough bread?
Sourdough bread is made by mixing flour, water, salt, and an active sourdough starter (wild yeast). The dough is slowly fermented, shaped, proofed, and baked at a high temperature to create its signature crust and flavour.
-
Is sourdough bread gluten-free?
No. Traditional sourdough bread made with wheat flour contains gluten. Although fermentation may reduce some gluten, it is not suitable for people with coeliac disease unless specifically made with certified gluten-free ingredients.
-
Is sourdough bread good for weight loss?
Sourdough bread can be part of a balanced diet. Its natural fermentation may help you feel fuller for longer, but weight loss still depends on your overall calorie intake and lifestyle.
-
Why is sourdough bread healthier?
The long fermentation process may improve digestibility, enhance flavour, and help your body absorb certain nutrients more easily. It also contains no commercial yeast and is made using simple ingredients.
-
What is sourdough bread?
Sourdough bread is a traditional bread made using a natural sourdough starter containing wild yeast and beneficial bacteria instead of commercial yeast. This gives it its distinctive flavour, texture, and crust.
-
Is sourdough bread good for diabetics?
Sourdough bread may have a lower glycaemic impact than some commercially produced white breads, but everyone responds differently. If you have diabetes, it’s best to enjoy it in moderation and follow your healthcare provider’s advice.
-
How should I store sourdough bread?
Store your sourdough at room temperature in a bread bag, paper bag, or wrapped in a clean tea towel. Avoid refrigerating it, as this can cause it to become stale more quickly.
-
How long does sourdough bread last?
Sourdough bread typically stays fresh for 3–5 days at room temperature. For longer storage, slice it and freeze it for up to three months.
-
Where can I buy sourdough bread?
You can order handcrafted sourdough bread directly from Cakella. Each loaf is freshly baked to order and available for collection from Kuilsriver or delivery within selected Cape Town areas.
-
What can you eat with sourdough bread?
Sourdough is incredibly versatile. Enjoy it with butter, cheese, soups, eggs, avocado, sandwiches, charcuterie boards, or simply toasted with your favourite toppings.
-
What are the benefits of sourdough bread?
Sourdough bread offers several benefits, including natural fermentation with wild yeast, a rich flavour, a crisp crust, improved digestibility for many people, and a longer shelf life than many commercially produced breads.